Easy Stage 2 Baby Food Recipes for Babies from 8 to 10-12 months of age.
These Stage 2 Homemade Baby Food Recipes are age appropriate for those babies who are 8 months and older. Some of these Stage 2 Homemade Baby Food Recipes are also appropriate for babies who began to eat solid foods at 6 months old. On this page you will also find more recipes suitable for those babies who are currently eating “Stage 2” baby foods.
What are “Stage 2” Baby Food Recipes? 
8-10 Months – Time to explore!
Bring on some spices and the softly mashed, or chopped into fine pieces of fruits, vegetables, meats, pasta and dairy such as yogurt and cheeses.
Pasta, veggies, and fruit should all be soft cooked and possibly mashed with a fork or masher. (Bananas need only be mashed.) Raw fruits are often introduced at this stage.
Meats and proteins such as egg yolk, should be cooked and pureed or chopped into small soft bits. If offering Tofu, you need not cook it first. Ensure dairy offered is easily manageable.
Remember, baby will not have molars until sometime around the 14-18 month age range. Foods should be easily mashed between the gums.
What does Stage 2 Baby Food Mean Anyway?
Stage 2 Baby Food is a term that applies to baby foods that are more thick and textured. Stage 2 Baby Foods also have ingredients that are suited to babies who are over 7-8 months of age such as meats and spices.
Some parents define Stage 2 baby foods as baby foods that are chunky. These foods should be appropriate for babies who are beginning to master “chewing” their foods and who have completely lost any form of the tongue thrust reflex. The commercial Stage 2 Baby Foods in this range are targeted to babies who are between the ages of 7-8 to 10 months old.
Stage 2 baby foods are foods that are still the lowest on the allergy scale however at this stage, some dairy and/or wheat products are often introduced. Stage 2 baby foods are typically those foods that are more fibrous, a bit more acidic and contain a higher amount of protein. These foods should be well tolerated and digested by this point. Some of these foods include, lentils, blueberries and egg yolks.
Stage 2 Homemade Baby Food Recipes – Cereals

30 Minute Cream of Grain Cereal
Ingredients:
- 1/4 c. freshly ground brown rice or millet with honey or molasses
- cinnamon (leave out honey for under 1yr and molasses is optional.)
- pure vanilla extract
- 1 c. almond milk, sweetened – use plain water for infants..
- 1/4 c. raisins (optional)
Directions:
Step 1: Put almond milk or water, ground grain and raisins in a pot.
Step 2: Bring just to the boiling point, stirring constantly, until the grain flour has absorbed the liquid.
Step 3: Turn off the heat and cover the pot.
Step 4: Put the pot over a double boiler on a low simmer for 20-30 minutes. (or simply turn burner down to low and simmer)
Optional: Add sliced bananas, sliced strawberries, blueberries, peaches and/or nut milk (consult your pediatrician about the use of nut milk prior to using it). From: keat.com
Rice Breakfast Pudding
Ingredients:
- 1/2 cup (Brown/or Jasmine) Rice (grind to barley size – don’t grind if serving to a Toddler )
- 2 cups water
- 1/4 cup apples sliced into small dices or slivers
- 1/4 cup raisins (optional)
- 1/8 cup brown sugar (optional)
- 2 tsp cinnamon
- 1/2 tsp ginger
Directions:
Step 1: Combine all of the above ingredients in a medium saucepan.
Step 2: Cook over medium-low heat for 30 minutes or until rice is soft, fragrant and a bit soupy
Step 3: Stir 1/8 cup milk into the rice, keep on heat for 10 more minutes. Keep a close watch to ensure that the consistency remains soupy but not pasty.
Step 4: Stir frequently to stop sticking to the pot and add more milk or water if necessary.
Step 5: Serve warm then transfer remaining portion to the fridge.

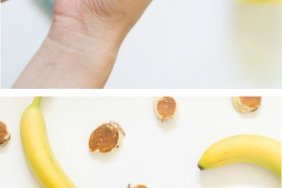
Pastina and Bananas
(8months+)
- 2 tablespoons Prince Pastina (little tiny star shaped pastas – **wheat based)
- 1 whole fresh banana)
Step 1: Prepare pastina as directed for hot cereal. Do not add milk. Stir in banana and serve.
Step 2: Add formula or breast milk as desired (1 serving)
**A few sources do say to not introduce wheat until after 1, 2 or even 3 years old. The majorities of sources however indicate and agree that wheat may be introduced around the age of 8-9 months old. It is best to wait to introduce wheat until you are certain that your infant has no reactions to rice, oats or barley. Consult your baby’s pediatrician.
For More Information About Homemade Baby Cereal, visit Our Homemade Baby Cereal FAQ and visit our Homemade Baby Cereal Recipes page for more recipes.
Stage 2 Homemade Baby Food Recipes – Fruits
Are you wondering about Juice for Your Baby? Read our article to find out about juice and the role it may or may not play in a baby’s diet.
FRUITY COMBOS
Mix these combos into Yogurt or Cereal or just mix ’em and serve. You can also cook these together for extra Yum. Learn about feeding baby Yogurt and Cheeses
- Peachy Sweet Potatoes
- Apples and Carrots
- Blueberry, Apple, and Pear Sauce
- Pears and Bananas
- Bananas and Blueberries
- Avocado, Peaches and Cream Cheese
- Apples and Pears
- Peaches and Bananas
- Bananas, Blueberries and Pears
- Apples and Plums
- Blueberries and Apples
- Pears, Peaches and ApplesHave you ever Baked Fruits? If not, we highly recommend it. Baked fruits are naturally sweet, soft and oh so very yummy.

Baked Apples 6-8 months+
Step 1: Core apple and leave peel on
Step 2: Place a wee bit of butter (if baby is ready for or has had dairy) on the inside of the cored apple (sprinkle a bit of cinnamon in the apple if your desire and if baby is ready for or has had cinnamon)
Step 3: Place in a pan with just enough water to slightly cover apples – about an inch of water
Step 4: Bake in a 400-degree oven for 30 minutes or until tender; be sure to check on the water level.
Step 5: Once baked, either cut apple into little bits and serve as a finger food or mash and make applesauce.
Blueberries** 8-10 months+
Vitamins: A, C, K, Folate
Minerals: Potassium, Sodium, Phosphorus, Iron, Magnesium, Calcium
- 1/2 pint of blueberries (fresh or frozen)
- 1/2 c. water
Step 1: Bring water to a boil. Add blueberries and simmer for 15 minutes until soft.
Step 2: Reserve liquid and use a slotted spoon to transfer blueberries to blender/processor/mixer and puree.
Step 3: If needed, add some of the liquid to blueberries.
Step 4: Add cereal (if desired) to thicken up
* You can save the liquid to serve as juice or to blend in with cereals etc.
** Visit the Blueberry Baby Foods page to get more recipes but most importantly, learn why blueberries are fine prior to 12 months of age.
Blueberry Banana Yogurt 8-10 months+
- 1 cup blueberries
- 1 whole banana
- 1 cup plain yogurt
- 2 tablespoons wheat germ
For Babies: Use 1 cup of your already made blueberry puree OR Microwave the blueberries just until the juices start to run, about 30 seconds. Place the banana, yogurt and blueberries in a blender and puree until smooth.
For Toddlers: Slice the banana. Microwave the blueberries just until the juices start to run, about 30 seconds. Place a little yogurt in a dish and top with banana slices, blueberries, wheat germ and serve. This will make 2-3 servings.
Kiwi 8-10 months+*
Vitamins: A, C, K, Folate
Minerals: Potassium, Phosphorus, Magnesium, Calcium
Step 1: Peel ripe kiwi
Step 2: Puree or mash with a fork – add cereal (if desired) to thicken and
Step 3: Achieve a smooth, thin consistency. Kiwi does not need to be cooked and it should not need to be de-seeded as it is typically introduced at an age where baby can tolerate raw fruits and a bit of texture.
* Kiwi is high in Vitamin C and is also acidic, you may wish to wait to introduce it when baby is 10 months or older.
Melons (cantaloupe, honeydew, watermelon)
8-10 months+
Vitamins: A, C, K, Folate
Minerals: Potassium, Phosphorus, Magnesium, Calcium
Step 1: 1/4 cup sliced, soft, seedless melon, rind removed
Step 2: Puree or mash with a fork – add cereal (if desired) to thicken up the melon achieve a smooth, thin consistency.
**Melon does not need to be cooked as it is typically introduced at an age where baby can tolerate raw fruits. Melon may be steamed to tender and then mashed if you prefer without harming it.
Be sure to visit these other food and recipe specific pages for more tasty homemade baby food ideas:
![]() Remember, always consult with your pediatrician regarding introducing solid foods to your baby and specifically discuss any foods that may pose allergy risks for your baby.
Remember, always consult with your pediatrician regarding introducing solid foods to your baby and specifically discuss any foods that may pose allergy risks for your baby.